50iniepoca - Forum dei 50 cc d'epoca

My Motom project 2

« Older   Newer »
  Share  
view post Posted on 6/3/2021, 14:13
Avatar

Export

Group:
Member
Posts:
799

Status:


Hello Morton enthusiasts.

Today I could do some work on the road going Motom
Have made some spacers to camouflage the top spring.
20210306_11230620210306_11254820210306_114533
20210306_12164820210306_12171220210306_123856

And I mounted the 18 inch wheels with new tyres to see how that looks.
20210306_133025_0_
20210306_132719_0


Now I'm thinking what to do with the fenders.
I had planned to make a nice classic 180 degrees front fender,
But now with the original (big) fenders it gives the Motom some body. (looking good too)
Should I shorten the rear fender to make it less massive, ore replaces it with a little one?


I will wait on my ordered fenders to show how they look.

Kind regards
Louis
 
Top
view post Posted on 20/3/2021, 14:50
Avatar

Export

Group:
Member
Posts:
799

Status:


We had some time to mount the front fender.
Perhaps not the prettiest solution, but it will need to do the job.
At least she has the original front fender to keep the known Motom looks.

More info here: http://guzzi-cardellino.com/motom-front-fender-1.html

Some pictures off the build.
20210320_121507
20210320_12234120210320_12374220210320_124359
20210320_132029

The next step is making some end stops for the steering angular.
Then I will take here apart and paint here properly, reassemble here again and start riding/ testing Motom engines.

Kind regards
Louis
 
Top
view post Posted on 21/3/2021, 13:11
Avatar

Export

Group:
Member
Posts:
799

Status:


Well, in big lines I know how the looks need to be, so it's time to take here apart and do a proper paint job.
Will fix scratches and damaged places so ones it will be painted, it should be OK

Going from this:
20210321_105657

To this:
20210321_11031420210321_114131_0_
20210321_11545820210321_121322

Here we have the new starting point. Will start repairing unnecessary holes. and weld thinks.
20210321_123528

Here we go:
20210321_133027
20210321_13370120210321_13380920210321_134008
20210321_142356

20210321_13413420210321_134231_0_20210321_134307

20210321_135228

Edited by Louis Motom - 21/3/2021, 15:00
 
Top
view post Posted on 27/3/2021, 20:32
Avatar

Export

Group:
Member
Posts:
799

Status:


Have all frame parts at the painter, so with a bid of luck it will be ready next week.
This gave me some time to solve the problems with the test engine.

1) The front sprocket off a Zappa engine is different than a normal Motom so had to create something the get 17T
2) And needed to find a useful top end with a 15/15 setup

The front sprocket I solved like this:
20210327_10021220210327_10153420210327_102200_0_20210327_102252_0_

Then weld, and machine it.
20210327_10593020210327_11054620210327_11343920210327_114212

But to get usable top end that was a bigger challenge.
I looked trough all the parts I bought an found a good cylinder and piston 40,2mm (on the left)
20210327_192332

Also found a 15/15 head.
20210327_15362520210327_155035_0_

But it was a strange head it had no center hole in it, need to drill it.
20210327_15581820210327_163542

The next problem I had is a 40,2 piston is hitting the stock head, because the combustion chamber is only 39,8mm.
I could widen the combustion chamber to +/-40,5mm but found a 39,3 cylinder and piston.
Sadly, this set is not that good as the 40,2's but will have to do. Think it will last a 100km for my first testings
Cleaned the piston and mounted it all.
20210327_173423

Hopefully I can finish the engine tomorrow, and it will be a plug and play when the frame comes back.

Kind regards
Louis
 
Top
view post Posted on 28/3/2021, 13:06
Avatar

Export

Group:
Member
Posts:
970
Location:
Roma zona Bufalotta

Status:


CITAZIONE (Louis Motom @ 27/3/2021, 21:32) 
Have all frame parts at the painter, so with a bid of luck it will be ready next week.
This gave me some time to solve the problems with the test engine.

1) The front sprocket off a Zappa engine is different than a normal Motom so had to create something the get 17T
2) And needed to find a useful top end with a 15/15 setup

The front sprocket I solved like this:
20210327_10021220210327_101534

Ciao Louis!
Perché non hai utilizzato l'albero secondario del Motom "codice"? Puoi sempre montarlo. Con l'asse motozappa ogni volta che devi sostituire il pignone devi fare questa modifica.
Saluti. Fabio.
 
Top
view post Posted on 28/3/2021, 14:58
Avatar

Export

Group:
Member
Posts:
799

Status:


Hello Fabio,

CITAZIONE
Perché non hai utilizzato l'albero secondario del Motom "codice"? Puoi sempre montarlo. Con l'asse motozappa ogni volta che devi sostituire il pignone devi fare questa modifica

Yes, you have full right, this is not a step I'm intended to do over and over again :)
But keep in mind this is my Test engine. (this engine is only build to give me a feeling what a Motom does)

For many of you guys the Motom is well known.
For me it is not, the only experience I have is:
1) A couple of blocks round the block at my place
2) A couple of runs at my parents place
3) Just some throttle responses in the garden.

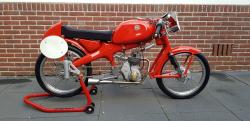
So to get me some experience I bought myself a road going Motom.
And this engine will be my test engine it will need to hold (estimated) around 500km in total. (So the sprocket is not new but I think she will hold)

I like to know/test the following.
1) How does the engine react on changing ignition timing (therefore the zappa engine it gives me easy access to change)
2) How does the engine react on bigger valves (starting now with 15/15) nexst will be 15/17 and 15/18 also 16/19 and hopfully a 17/20
3) How does the engine react on bigger carbs (starting now with 9mm) nexst will be 12mm 14mm 15mm 16mm 18mm
4) How does the engine react on bigger pistons (starting now with a 39,3) nexst will be 40,2 also have 41+ etc

Hope to get my frame back soon so I can put it all back and make a running Motom.

Kind regards
Louis
 
Top
view post Posted on 28/3/2021, 17:43
Avatar

Export

Group:
Member
Posts:
799

Status:


Could do some work on the ignition system.
The idea is to make it easy for me to check the ignition timing with a timing light.

I made the following.
20210328_13043720210328_13181620210328_132754_0_20210328_135853
20210328_14123720210328_14312320210328_14501020210328_145053_0_
20210328_15084920210328_15134220210328_15202120210328_163320

More and larger pictures here: http://guzzi-cardellino.com/motom-ignition-cover.html

Say one thing I noticed, I'm not happy with.
It looks like the inlet rocker arm is too large, but is the same as all others I have. So the intake valve is not pressed at center.
20210328_115535

Hopefully it will hold a +/-50km

Kind regards
Louis
 
Top
view post Posted on 29/3/2021, 19:16
Avatar

Export

Group:
Member
Posts:
799

Status:


The Painter sent me these pictures, tomorrow it will be "fire red" :)

20210329_133018_0_20210329_133022
20210329_13302720210329_133036
 
Top
view post Posted on 30/3/2021, 18:41
Avatar

Export

Group:
Member
Posts:
799

Status:


The painter sent me these pictures, its now all red :)
It looks great.

20210330_080919
20210330_080925
20210330_080929
20210330_080936
20210330_080944

With a bit of luck, I can start mounting parts this weekend.

Also blast the aluminium parts, looking very clean
20210330_171626
20210330_182329
 
Top
view post Posted on 3/4/2021, 19:40
Avatar

Export

Group:
Member
Posts:
799

Status:


Slowly getting there, starting to mount parts back.
Got a rolling chassis again, but its far from ready. (head light and tail light will be painted black)

20210403_102038
20210403_104620

20210403_165141
20210403_165145
 
Top
view post Posted on 4/4/2021, 17:30
Avatar

Export

Group:
Member
Posts:
799

Status:


Also today I could make some small steps.
But still a lot of work needs to be done., for one thing I don't like the exhaust. (Pointing downwards) will need to change that.
Also the black cables will be grey to get one uni setup.

20210404_170817
20210404_171054
 
Top
view post Posted on 4/4/2021, 20:07

Codice

Group:
Member
Posts:
392

Status:


Bellissimo Louis :woot: :woot:
 
Top
view post Posted on 5/4/2021, 09:23
Avatar

Export

Group:
Member
Posts:
799

Status:


Hello Motomrrad,

CITAZIONE
Bellissimo Louis

Thanks :)

This is the idea in big lines, she still needs more work on the details.
jpg
 
Top
view post Posted on 5/4/2021, 14:14
Avatar

Export

Group:
Member
Posts:
799

Status:


Could do a tiny bit more today.
1) Changed the black cables into grey cables.
2) Mount a different ignition coil.
3) Fixed the carb (experimental) http://guzzi-cardellino.com/motom-9mm-experimental-carb.html

20210405_140830

Mounted a different exhaust, this one fits much better but is very rusty. Need to findout witch type this is.
20210405_142936

I need this type
20210405_141948_0

Not this one
20210405_142025_0_
 
Top
view post Posted on 5/4/2021, 16:29

Codice

Group:
Member
Posts:
392

Status:


Ciao Louis,
le marmitte originali di fabbrica sono circa tutte uguali, anche se il numero stampato è diverso.
Cambia la curva per le marmitte più vecchie che vanno montare sulla serie 12, dove cilindri hanno la testa insieme al cilindro, sono i modelli più vecchi.
La cosa da sapere è che all'interno del silenziatore ci sono 2 ostruzioni (paratie, setti) di lamiera che ostruiscono lo scarico.
Se vuoi far girare bene il motore con lo scarico di fabbrica devi rompere queste due paratie, per farlo basta usare una barra di ferro piatto da inserire nel buco di scarico e colpire con un martello.
Quando sono rotte le ostruzioni il motore va molto meglio e non fa tanto rumore.
Allego schema della marmitta che cerchi.

CIAOMarmitta_MTM
 
Top
509 replies since 20/2/2021, 16:57   14850 views
  Share